
Most people buy an ergonomic chair expecting it to fix their back pain — then wonder why discomfort persists after weeks of use. The chair is only one element in a workspace setup where every component’s position matters as much as its quality.
This guide covers the complete ergonomic positioning of your workspace: monitor height, keyboard placement, desk dimensions, lighting angles, and how these elements work together to either create or prevent chronic pain. The science-backed measurements that determine whether you end the workday energized or exhausted.
Quick Navigation
- Why Workspace Setup Matters More Than Equipment Quality
- The Ergonomic Measurement Framework
- Chair Position: The Foundation
- Desk Height and Clearance
- Monitor Positioning
- Keyboard and Mouse Placement
- Lighting Setup
- Secondary Monitor Configuration
- Standing Desk Positioning
- Common Setup Mistakes
- The 90-Degree Rule Explained
- FAQ
Why Workspace Setup Matters More Than Equipment Quality
A $1,200 ergonomic chair positioned incorrectly causes the same back pain as a $50 basic office chair. A premium 4K monitor at the wrong height creates the same neck strain as a budget display. Equipment quality matters — but positioning determines whether that quality translates to actual comfort.
The Cumulative Load Problem
Your body tolerates small positioning errors for short periods. Neck flexed 15 degrees downward for 30 minutes? Manageable. The same position held for 6-8 hours daily across months and years? This is when repetitive strain injuries develop.
According to research published by the Occupational Safety and Health Administration (OSHA), musculoskeletal disorders from poor workstation setup are among the most common workplace injuries — responsible for roughly 30% of all workers’ compensation costs in office environments.
The body adapts to sustained positions by shortening muscles on one side and lengthening on the other. Forward head posture from monitor height too low creates permanent muscle imbalances that persist even away from the desk. Wrist extension from keyboard placement too high leads to carpal tunnel syndrome that doesn’t resolve until positioning changes.
The measurement framework that follows addresses root causes, not symptoms.
The Ergonomic Measurement Framework
Ergonomic positioning uses your body’s natural measurements as the reference points. Every person’s ideal setup is different because arm length, torso height, and leg length vary. Following absolute measurements (“desk should be 29 inches high”) fails for anyone whose proportions differ from average.
Your Body’s Key Measurements
Seated elbow height: Sit upright with upper arms hanging naturally. Measure from floor to the point where your forearm meets your upper arm (elbow joint). This determines desk height and armrest height.
Eye level (seated): Measure from floor to the center of your eyes when sitting upright with head level. This determines monitor height.
Seated popliteal height: Measure from floor to the back of your knee when seated with feet flat. This determines minimum seat height.
Hip-to-knee length: Measure from your hip joint to the back of your knee. This determines seat depth.
These measurements create your ergonomic baseline. Every positioning recommendation below references these measurements rather than absolute distances.
Chair Position: The Foundation
Chair setup determines the starting point for every other measurement. Incorrect chair position cascades into incorrect desk height, wrong monitor placement, and poor posture regardless of other adjustments.

Seat Height
Target: Feet flat on floor with thighs parallel to ground or angled slightly downward (95-100 degrees at hip).
How to measure: Adjust seat height until your seated popliteal height measurement equals the seat height. Your knees should be at approximately the same level as your hips or slightly lower — never higher.
Why this matters: Seat too high forces your feet to dangle or rest on tiptoes, transferring thigh weight to the front edge of the seat and creating pressure on blood vessels. Seat too low angles your knees above your hips, rotating the pelvis backward and flattening the lumbar curve.
If your desk height is fixed and your chair cannot adjust low enough for feet to reach the floor, use a footrest. The floor height is negotiable — the knee angle is not.
Seat Depth
Target: 2-4 finger widths of clearance between the front edge of the seat and the back of your knees.
How to measure: Sit fully back against the backrest. Slide your hand between the seat edge and the back of your knee. You should fit 2-4 fingers comfortably in this gap.
Why this matters: Seat too deep forces you to choose between lumbar support (sitting back) and proper leg support (sitting forward). Most people sit forward, losing all back support. Seat too shallow provides insufficient thigh support, transferring more weight to the lower back.
Many ergonomic chairs designed for back pain relief include seat depth adjustment specifically because leg length varies significantly even among people of the same height.
Lumbar Support Position
Target: Support contacts the natural inward curve of your lower back, typically 4-6 inches above the seat at the L3-L5 vertebrae region (roughly belt line).
How to measure: Sit upright without leaning. Note where your lower back naturally curves inward. Adjust lumbar support height and depth until you feel gentle, consistent pressure at this point without having to lean into it.
Why this matters: Lumbar support too high pushes your mid-back, forcing you to lean forward to avoid it. Too low provides no support to the lumbar curve. Correct positioning maintains the spine’s natural S-curve during all-day sitting.
Armrest Height
Target: Armrests at elbow height when shoulders are relaxed (not shrugged or dropped).
How to measure: Sit upright with upper arms hanging naturally at your sides. Adjust armrests until your forearms rest lightly on them without lifting your shoulders or bending your elbows more than 90-100 degrees.
Why this matters: Armrests too high force shoulder elevation, creating trapezius tension and neck strain. Too low requires you to reach down or lean to one side, rotating the spine and creating asymmetrical loading.
If armrests force poor posture at the correct height, remove them. No armrest is better than an armrest that forces shoulder elevation.
Desk Height and Clearance
Desk height determines whether you can maintain neutral wrist and elbow position while typing. Most standard desks (29-30 inches) work for average height users but create problems at height extremes.

Desk Surface Height
Target: Desk surface at seated elbow height or 1-2 inches below when sitting upright.
How to measure: Sit in your correctly adjusted chair. Let your upper arms hang naturally. Measure from floor to elbow. Your desk surface should be at this height or slightly lower.
Why this matters: Desk too high forces shoulder elevation or wrist extension while typing. Desk too low requires hunching forward and rounding the shoulders. Both create sustained muscle tension across the neck, shoulders, and upper back.
Standard desk heights:
- 28-30 inches: Fits most people 5’4″ to 6’0″
- Below 28 inches: Needed for users under 5’4″
- Above 30 inches: Needed for users over 6’2″
If your desk is fixed-height and doesn’t match your seated elbow height, you have two options: adjust chair height (and use a footrest if needed), or replace the desk with an adjustable-height desk.
Keyboard Tray Considerations
Keyboard trays mounted below the desk surface can lower the typing surface to proper height when the desk itself is too high. This works well for shared workspaces or fixed-height desks.
Target tray height: Seated elbow height minus 2-3 inches (to account for keyboard thickness and slight downward forearm angle).
Thigh Clearance
Target: 2-3 inches minimum clearance between the top of your thighs and the bottom of the desk.
Why this matters: Insufficient clearance forces you to perch forward on the seat edge, losing lumbar support. This is a common problem when users adjust chair height to match desk height without considering leg clearance.
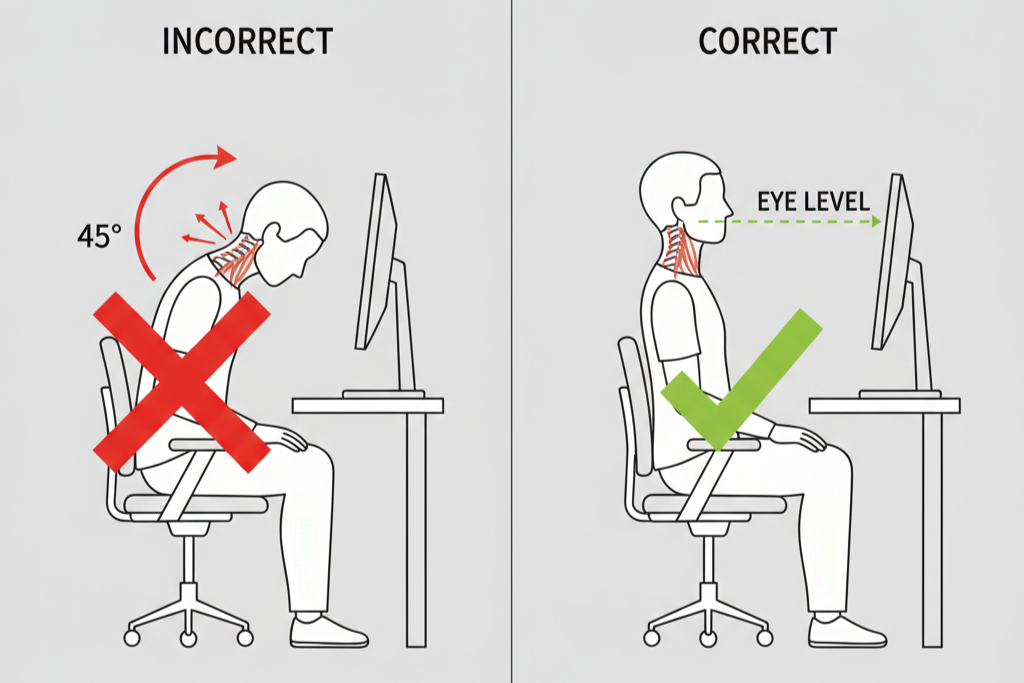
Monitor Positioning: The Most Common Error
Monitor height is the single most frequently incorrect element in workspace setups. The default position — monitor sitting on the desk surface — is wrong for nearly everyone, forcing chronic downward neck flexion that creates cascading problems.
Monitor Height
Target: Top of the screen at or slightly below eye level when sitting upright looking straight ahead.
How to measure: Sit upright in your correctly adjusted chair looking straight forward (not down). Your eye line should hit the top third of the screen. The center of the screen should be 15-20 degrees below horizontal eye level.
Why this matters: Every degree of downward neck flexion increases the effective weight of your head on your cervical spine. At neutral (0 degrees), your head weighs approximately 10-12 pounds. At 15 degrees downward, effective weight increases to 27 pounds. At 30 degrees, 40 pounds. At 45 degrees (looking down at a monitor on the desk), 49 pounds.
Research from the Journal of Physical Therapy Science confirms that sustained forward head posture — caused primarily by monitor height too low — is directly associated with neck pain, headaches, and reduced lung capacity.
Practical implementation: Most monitors require a stand, riser, or adjustable monitor arm to reach correct height. Books, monitor risers, or dedicated monitor arms all work. The monitor sitting directly on the desk is correct only for users approximately 6’4″ or taller.
For detailed monitor selection and setup, see our guide to monitors for work from home.
Monitor Distance
Target: Arm’s length away (20-26 inches) for most users. Increase distance for screens larger than 24 inches.
How to measure: Sit upright and extend your arm forward. Your fingertips should just touch the screen surface. For screens 27 inches or larger, move the monitor back an additional 4-6 inches.
Why this matters: Monitor too close forces eye convergence strain and encourages forward head posture to maintain focus. Too far reduces text readability, forcing squinting or leaning forward.
Text size test: At correct distance, you should read 12-point font comfortably without leaning forward or squinting. If you cannot, either move the monitor closer or increase system text scaling — do not lean forward.
Monitor Tilt
Target: Screen perpendicular to your natural eye line or tilted back 10-20 degrees maximum.
Why this matters: Screen tilted too far back (30+ degrees) requires neck extension to view the top of the screen. Screen tilted forward creates glare from overhead lighting. Perpendicular or slight backward tilt optimizes viewing angle without requiring neck movement.
Laptop-Specific Positioning
Laptops force a choice between correct keyboard position and correct screen position — you cannot have both simultaneously with the built-in keyboard and display.
Solution: External monitor at correct height plus external keyboard at desk level, OR laptop on a stand at correct screen height plus external keyboard and mouse at desk level.
Laptop alone on desk surface creates guaranteed neck and shoulder problems with extended use. For daily 6-8 hour work, a laptop requires external peripherals.
Keyboard and Mouse Placement
Keyboard and mouse position determines wrist and shoulder posture. Incorrect placement creates carpal tunnel syndrome risk and shoulder tension that many users attribute to other causes.
Keyboard Position
Target: Directly in front of you at elbow height with wrists in neutral position (straight line from forearm through wrist to hand).
How to measure: Place keyboard so the home row (ASDF / JKL;) aligns with your body centerline. When typing, your elbows should be at 90-100 degrees with forearms parallel to the floor or angled slightly downward (never upward).
Why this matters: Keyboard too high forces wrist extension (wrists bent backward), compressing the median nerve through the carpal tunnel. Keyboard angled away from center forces shoulder rotation and asymmetrical loading.
Keyboard tilt: Most ergonomic guidance recommends negative tilt (front edge higher than back edge, opposite of typical keyboard feet). This maintains neutral wrist position. If your keyboard lacks negative tilt capability, keep it flat — do not use the pop-out feet that angle the back edge higher.
Mouse Position
Target: Directly beside keyboard at the same height, within easy reach without extending or rotating shoulder.
How to measure: Place mouse so reaching it requires no shoulder extension, rotation, or elevation. Your elbow should remain at 90-100 degrees with upper arm hanging naturally.
Why this matters: Mouse positioned too far forward or to the side forces sustained shoulder muscle engagement to hold arm position. This creates trapezius and rotator cuff tension that persists even after work.
For heavy mouse users: Consider a vertical mouse that maintains wrist in neutral rotation rather than pronated (palm down). Standard mice require wrist pronation that can create forearm strain with sustained use.
Wrist Rest Consideration
Wrist rests are helpful during typing breaks but should not be used while actively typing. Rest your palms during pauses, not while your fingers are moving. Active typing with wrists resting creates static wrist extension.
Lighting Setup: The Overlooked Factor
Lighting position affects eye strain, screen glare, and neck posture. Poor lighting forces postural compensation that creates problems users don’t connect to light source placement.
Primary Workspace Lighting
Target: Ambient lighting at 300-500 lux (comparable to soft office lighting) with no direct glare on screen or in eyes.
How to implement: Position primary lighting source to the side and slightly behind your monitor. Avoid overhead lighting directly above the monitor (creates screen glare) or directly above your head (creates harsh shadows on workspace).
Why this matters: Lighting directly behind your monitor creates glare, forcing you to tilt the screen or your head to avoid it. Lighting too dim encourages leaning toward the screen, creating forward head posture. Lighting too bright creates eye strain and headaches.
For detailed lighting solutions, see our guide to LED desk lamps with eye protection.
Screen Brightness Relative to Ambient Light
Target: Monitor brightness approximately equal to ambient room brightness — not significantly brighter or darker.
Why this matters: Monitor much brighter than surroundings creates eye fatigue from constant pupil constriction. Monitor dimmer than surroundings is harder to read, encouraging forward head posture.
Practical test: Display a white screen. If it looks like a light source illuminating the room, it’s too bright. If you cannot read white text comfortably, it’s too dim.
Window Positioning
Windows should be perpendicular to your monitor (to your left or right), never behind the monitor (creates backlight glare) or behind you (creates reflection glare on screen).
If windows are unavoidable behind or in front of your monitor, use curtains, blinds, or monitor hoods to control direct light.
Secondary Monitor Configuration
Dual or triple monitor setups create specific ergonomic challenges that single-monitor positioning does not. The primary consideration is reducing repetitive neck rotation.
Dual Monitor Setup — Equal Use
Configuration: Monitors positioned in a slight V-shape with the meeting point directly in front of you. Each monitor angled 15-20 degrees inward.
Why this matters: Placing one monitor directly in front and one to the side creates sustained neck rotation toward the side monitor if you use both equally. The V-configuration minimizes rotation angle.
Height: Both monitors at the same height with top edges at or slightly below eye level.
Dual Monitor Setup — Primary/Secondary Use
Configuration: Primary monitor directly in front of you at correct height and distance. Secondary monitor to the side at the same height.
Why this matters: If you use one monitor 70-80% of the time, that monitor should be centered in front of you. Only position monitors symmetrically if usage is genuinely balanced.
Triple Monitor Setup
Configuration: Center monitor directly in front, side monitors angled inward 30-40 degrees, all at the same height.
Alternative: Vertical stacking can work better than horizontal arrangement for some workflows — primary monitor at correct height directly in front, secondary monitor mounted above at a steeper viewing angle for reference material.
Standing Desk Positioning: Different Rules
Standing desk ergonomics follow similar principles with different specific measurements. Standing is not automatically better than sitting — standing with poor positioning creates its own problems.
Standing Desk Height
Target: Desk surface at standing elbow height when arms hang naturally at sides.
How to measure: Stand upright with shoulders relaxed and upper arms hanging naturally. Bend elbows 90 degrees. Desk surface should be at this elbow height or 1-2 inches below.
Why this matters: Desk too high forces shoulder elevation. Too low forces hunching forward. Both create sustained muscle tension across different muscle groups than sitting, but equally problematic.
Monitor Height (Standing)
Target: Top of screen at eye level or slightly below when standing upright looking straight ahead.
Implementation: Standing raises your eye level 10-14 inches compared to sitting. Your monitor must raise by the same amount, or you create forward head posture identical to sitting with monitor too low.
Practical solution: Monitor arms that adjust vertically make alternating between sitting and standing viable. Fixed-height monitors work only if dedicated to one position.
Anti-Fatigue Mats
Standing on hard floors creates leg and lower back fatigue within 30-45 minutes for most people. Anti-fatigue mats with 1/2 to 3/4 inch cushioning significantly extend comfortable standing time.
Standing Duration
Research suggests alternating positions every 30-45 minutes: 30 minutes sitting, 15 minutes standing, repeat. All-day standing creates circulation and joint problems. The movement between positions provides the benefit, not standing itself.
Common Ergonomic Setup Mistakes
Mistake 1: Buying Equipment Before Measuring
Problem: You buy an ergonomic chair, expensive monitor, and standing desk assuming they’ll be adjustable enough — only to discover your height, desk configuration, or room constraints prevent correct positioning.
Solution: Measure your body dimensions and available space first. Verify that equipment adjustment ranges actually accommodate your measurements. Premium ergonomic chairs typically adjust across a wider range than budget models, but none adjust infinitely.
Mistake 2: Setting Up Monitor Height Based on Neck Comfort
Problem: You tilt your head down habitually and position the monitor where it feels comfortable in that position, cementing poor posture rather than correcting it.
Solution: Force yourself to sit upright with head level as the baseline, even if it feels unnatural initially. Position the monitor for this posture. The discomfort from sitting upright indicates muscle weakness and habitual poor posture — both improve with time, but only if you don’t accommodate them.
Mistake 3: Ignoring Keyboard Tray When Desk Is Too High
Problem: Your desk surface is 30 inches high, but your seated elbow height is 26 inches. You raise your chair to match desk height, creating insufficient thigh clearance and forcing your feet off the ground.
Solution: Install a keyboard tray or replace the desk. Raising chair height to match desk height when the desk is too high creates cascading problems. The keyboard must come to you, not you to the keyboard.
Mistake 4: Assuming “Ergonomic” Equipment Works Without Adjustment
Problem: You buy an ergonomic chair and use it in default settings, never adjusting lumbar support, armrests, or seat depth.
Solution: Ergonomic equipment requires configuration. Spending 20 minutes adjusting the chair correctly provides more value than buying a $1,000 chair and using it incorrectly.
Mistake 5: Copying Someone Else’s Setup
Problem: You see a colleague’s ergonomic setup and replicate the exact measurements — monitor height, chair settings, desk configuration — without accounting for your different body proportions.
Solution: Use the measurement framework based on your own body dimensions. Someone 6 inches taller or shorter requires completely different absolute measurements even though the ergonomic principles are identical.
The 90-Degree Rule Explained
Ergonomic positioning is often simplified as “everything at 90 degrees” — elbows, knees, hips all at 90-degree angles. This is a useful starting approximation but not entirely accurate.
Where 90 Degrees Applies
Elbows: 90-100 degrees is correct when typing or using a mouse.
Knees: 90-100 degrees is correct when feet are flat on the floor.
Where 90 Degrees Doesn’t Apply
Hips: Slightly more than 90 degrees (100-110 degrees) is better for lumbar support. Perfectly upright (90 degrees) is harder to sustain and provides less disc pressure relief than slight recline.
Monitor viewing angle: 15-20 degrees below horizontal is correct, not 90 degrees perpendicular.
The 90-degree rule provides a quick sanity check but should not override the specific measurement-based positioning described above.
Frequently Asked Questions
How long does it take to adjust to correct ergonomic positioning?
Most people experience 3-7 days of mild discomfort when switching from poor positioning to correct positioning. Muscles that have shortened from sustained poor posture feel tight when stretched to correct length. Weak postural muscles fatigue quickly when engaged properly for the first time in months or years. This discomfort typically resolves within one week as muscles adapt. Genuine ergonomic problems — sharp pain, numbness, tingling — should not occur and indicate positioning still incorrect.
Is standing all day better than sitting all day?
No. Research comparing all-day standing to all-day sitting finds both create problems — different problems, but equally problematic. Standing creates leg fatigue, joint stress, and circulation issues. Sitting creates hip flexor shortening and lumbar disc compression. Alternating between sitting and standing every 30-45 minutes provides benefits neither position alone offers. The movement is the benefit, not the specific position.
Can I use a regular chair instead of an ergonomic chair if I set it up correctly?
For short periods (2-3 hours daily), yes — correct positioning matters more than chair quality. For all-day work (6-8+ hours daily), ergonomic chair features like adjustable lumbar support, seat depth adjustment, and quality seat cushioning become necessary. A basic chair correctly adjusted beats a premium chair positioned poorly, but a premium chair correctly adjusted beats both.
Do I need a separate keyboard and mouse if I use a laptop?
For occasional use (less than 2 hours daily), the built-in laptop keyboard and trackpad are acceptable. For regular work (4+ hours daily), external keyboard and mouse are essentially mandatory. Laptop screen height and keyboard position cannot both be correct simultaneously — you must choose, and the correct choice is external keyboard with laptop elevated to correct screen height.
How often should I adjust my ergonomic setup?
Measure and adjust once when setting up, then reassess every 3-6 months or when you experience new discomfort. Small positioning drift is normal — a monitor gradually tilts forward, a chair seat height loosens slightly. Seasonal changes (heavier shoes in winter versus lighter in summer) can affect seated height enough to warrant minor adjustment.
What if my desk is fixed-height and too high for me?
Three solutions: (1) Install a keyboard tray to lower the typing surface, (2) raise your chair height and use a footrest, or (3) replace the desk with an adjustable-height desk. Option 1 is cheapest and works well if you have sufficient under-desk clearance. Option 2 works if your chair adjusts high enough. Option 3 is most expensive but provides long-term flexibility.
Key Takeaways
Ergonomic workspace setup succeeds or fails at the measurement level. Monitor height determines whether you develop forward head posture and neck pain. Desk height determines whether you create wrist extension and shoulder tension. Chair position determines lumbar support effectiveness regardless of chair quality.
The framework is consistent: measure your body dimensions first, use those measurements to position equipment, verify positioning creates neutral joint angles across elbows, wrists, neck, and hips. Equipment quality amplifies good positioning but cannot compensate for poor positioning.
Most workspaces require 20-30 minutes of deliberate adjustment to achieve correct positioning — measure seated elbow height, adjust chair and desk accordingly, measure eye level, adjust monitor height, verify wrist neutral position with keyboard placement. This 30-minute investment prevents months or years of accumulated postural problems that typically require professional treatment to resolve.
Workspace ergonomics is not about comfort preferences — it is about biomechanical positioning that allows sustained work without creating repetitive strain injuries. The positioning often feels unnatural initially because it requires engaging weak postural muscles and stretching shortened muscle groups. This discomfort resolves within days as the body adapts to correct positioning. Chronic pain from poor positioning persists indefinitely until positioning changes.
Related guides:
- The Best Ergonomic Chair Features for Back Pain Relief
- Top 10 Monitors for Work from Home: Detailed Reviews
- Top 7 LED Desk Lamps with Eye Protection for Late-Night Study
- Blue Light Glasses: What the Research Says vs. What Brands Claim
- Best Home Products for Small Apartments (Space-Saving Picks)
- Boost Your Productivity: The Best Desk Gadgets on Amazon (2026 Guide)