I still remember that frustrating evening. I had just finished recording what I thought was my best YouTube video yet. The content was perfect. My energy was great. I was excited to edit and upload.
Then I opened the audio file.
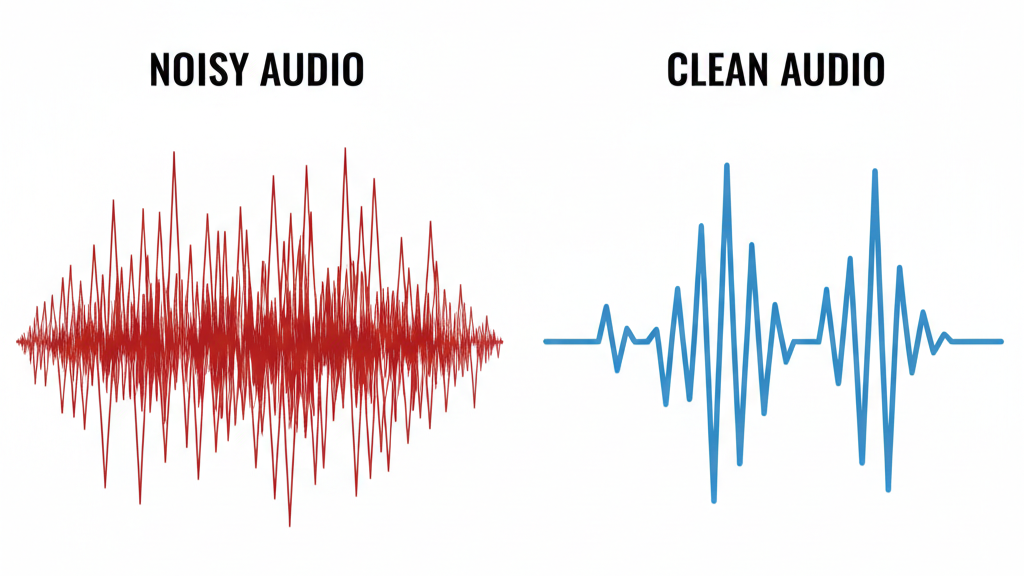
My heart sank. Every word I spoke was buried under background noise. The ceiling fan hummed constantly. My keyboard clicks echoed through every sentence. Even the slight buzz from my computer was clearly audible.
That wasn’t the first time. It was probably the twentieth.
The Problem That Nearly Killed My YouTube Channel
For months, I struggled with the same issue. Background noise ruined every single recording.
I tried everything I could think of. Recording late at night when the house was quiet? The refrigerator hum still came through. Hanging blankets around my desk? It helped a little, but not enough.
The worst part? I was using what I thought was a decent microphone.
Every comment section had the same feedback: “Great content, but the audio quality needs work.” One viewer wrote, “I had to stop watching because of the background noise. Sorry.”
That comment hurt. But they were right.
I spent hours editing each video. Trying to remove background noise in post-production became exhausting. The audio never sounded natural afterward. It was either muddy or had weird artifacts.
Something had to change.
Why Regular Microphones Pick Up Everything
Here’s what I learned the hard way. Most budget microphones use condenser capsules. These are incredibly sensitive.
That sensitivity sounds great in theory. In practice? They pick up absolutely everything.
Your neighbor’s dog barking? Recorded. Traffic outside? Crystal clear. Your own breathing? Louder than your actual voice sometimes.
I needed a solution that would reject background noise naturally. Not just mask it with software. Something that would focus on my voice and nothing else.
Discovering the MAONO PD200X: A Different Approach
After researching for weeks, I kept seeing the same recommendation. Dynamic microphones work differently than condensers.
They’re less sensitive to distant sounds. They focus on what’s directly in front of them. Professional broadcasters use them for exactly this reason.
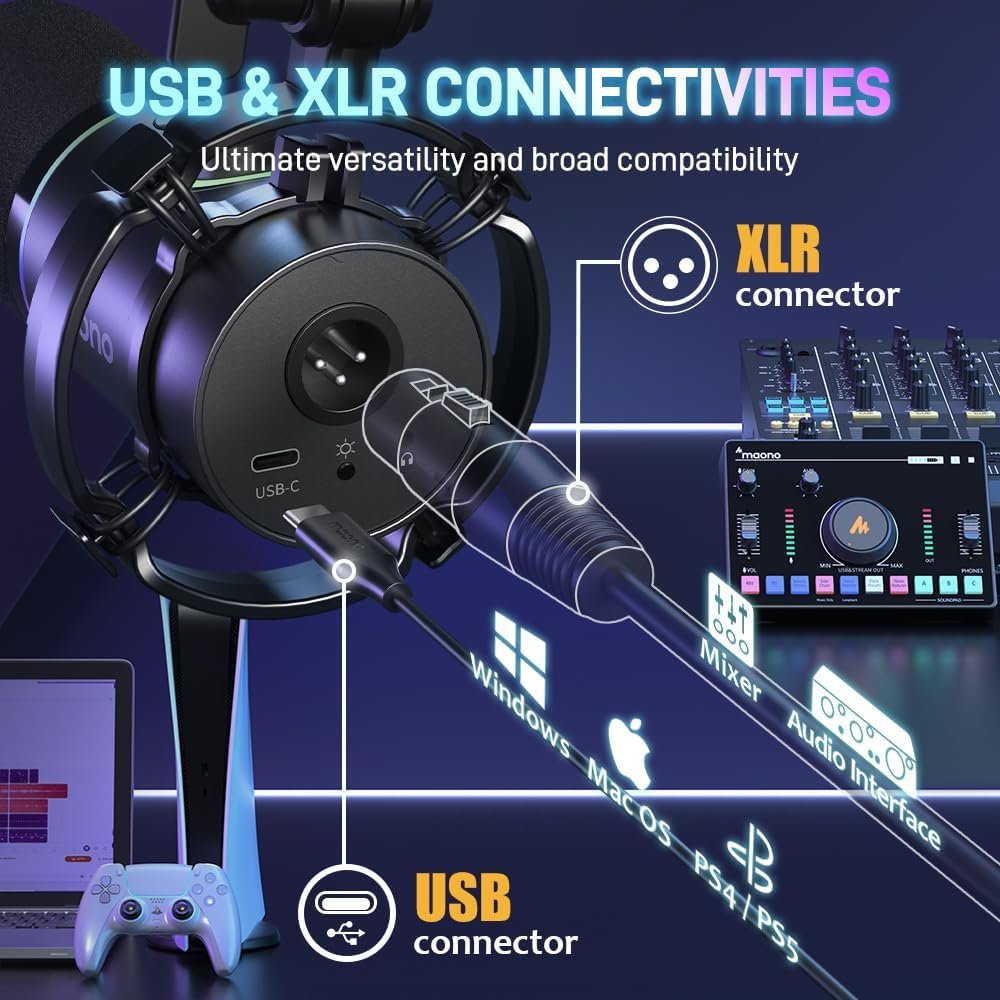
The MAONO PD200X caught my attention for several reasons. First, it offered both USB and XLR connectivity. This meant I could start simple with USB, then upgrade my setup later if needed.
Second, it had built-in controls. A gain knob, volume control, and mute button right on the microphone. No diving into software settings mid-recording.
Third, and this surprised me, it had RGB lighting. Not essential for audio quality, but it looked professional on camera. My setup finally looked as good as I wanted my content to be.
The price point made sense too. Not so cheap that I’d worry about quality. Not so expensive that I’d second-guess the purchase.
I ordered it. MAONO PD200X
First Impressions: Build Quality Matters
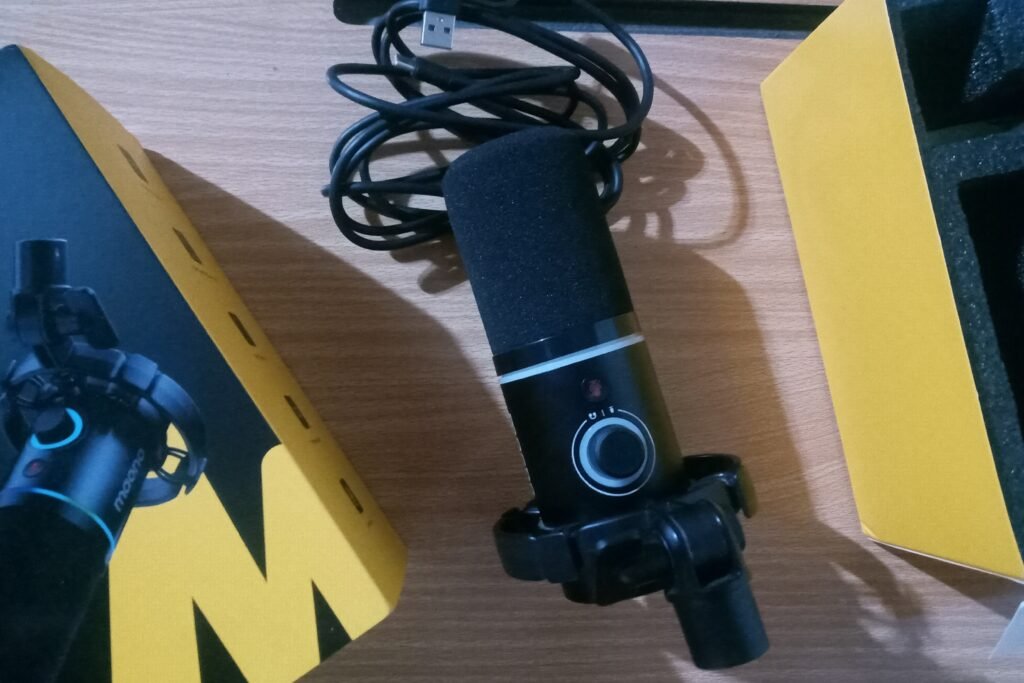
When the package arrived, I was impressed immediately. The metal construction felt solid. Premium. Not like the plastic microphones I’d used before.
The box included everything I needed. The microphone itself, a shock mount, a USB-C to USB-A/C cable, and a 5/8″ to 3/8″ adapter. No XLR cable, but I was using USB mode anyway.
Setting it up took less than five minutes. Plug in the USB cable. Mount it on my boom arm. Connect my headphones to the 3.5mm jack.
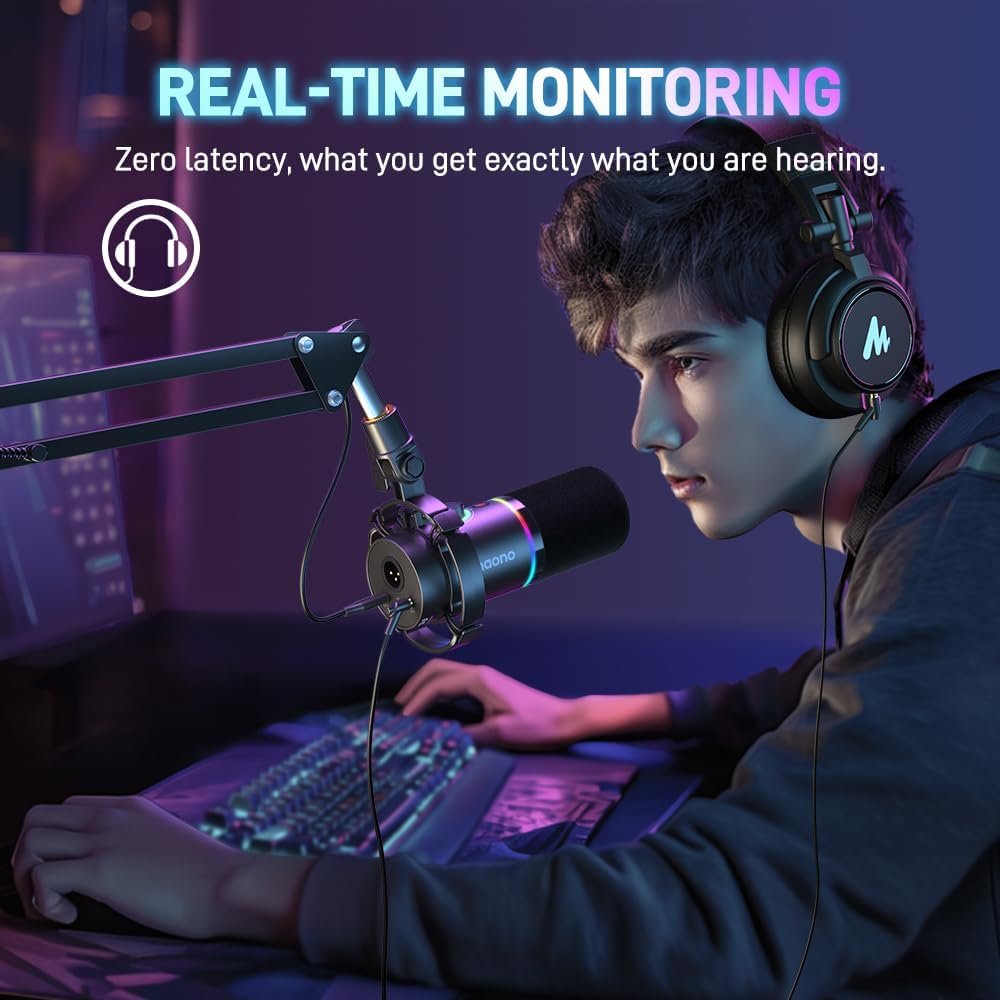
That headphone jack turned out to be crucial. Real-time monitoring meant I could hear exactly what the microphone was capturing. No more surprises during editing.
The smart knob design was genius. One knob controlled both microphone gain and headphone volume. Twist one way for gain, the other way for volume. Simple and effective.
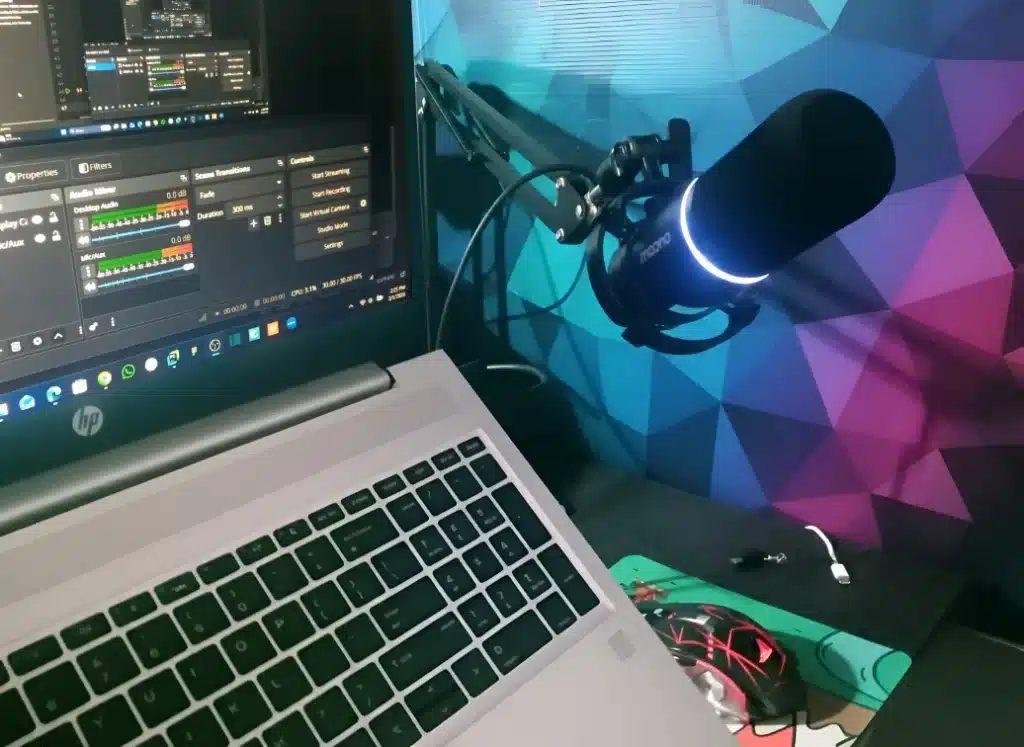
The Real Magic: Connecting to OBS Studio
Here’s where everything changed. The MAONO PD200X sounded good right out of the box. But combining it with OBS Studio filters? That’s when the magic happened.
I connected the microphone to OBS Studio as my audio input. Then I started adding filters. These filters transformed good audio into professional-quality sound.
Let me walk you through exactly what I did.
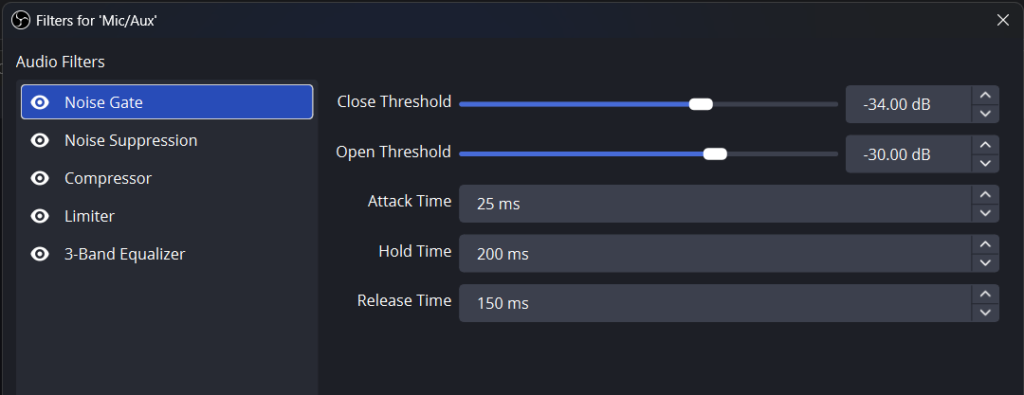
Step 1: Adding the Noise Gate Filter
The Noise Gate became my first line of defense against background noise. Think of it like a smart door. When your voice reaches a certain volume, the door opens. When you stop talking, it closes.
This eliminated all the quiet background noise between my sentences. No more constant hum. No more ambient room tone. Just silence when I wasn’t speaking.
Here are my exact settings:
Close Threshold: -34.00 dB
Open Threshold: -30.00 dB
Attack Time: 25 ms
Hold Time: 200 ms
Release Time: 150 ms
Let me explain why these numbers matter. The close threshold is where the gate shuts. Set it too high, and it cuts off your words. Too low, and background noise sneaks through.
The attack time is how fast the gate opens when you start speaking. 25 ms is quick enough that you don’t lose the beginning of words. The hold time keeps the gate open for 200 ms after you stop talking. This prevents choppy audio.
The release time smoothly closes the gate. 150 ms gives a natural fade instead of an abrupt cut.
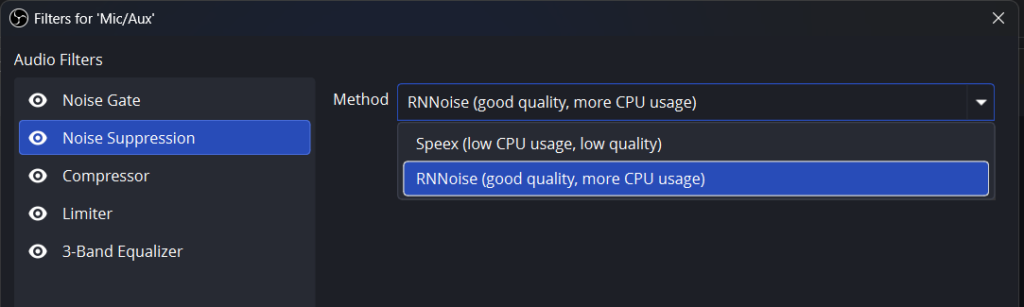
Step 2: Enabling Noise Suppression
Even with the noise gate, some background noise still appeared during my speech. That’s where Noise Suppression came in.
OBS Studio offers two methods. Speex uses less CPU but provides lower quality. RNNoise uses more processing power but sounds significantly better.
I chose RNNoise. My computer could handle it, and the quality difference was obvious.
This filter works like magic. It analyzes your voice in real-time. Then it removes everything that doesn’t sound like speech. Keyboard clicks disappeared. Mouse movements vanished. Even my chair squeaking was gone.
The result? Clean audio that sounded professional.
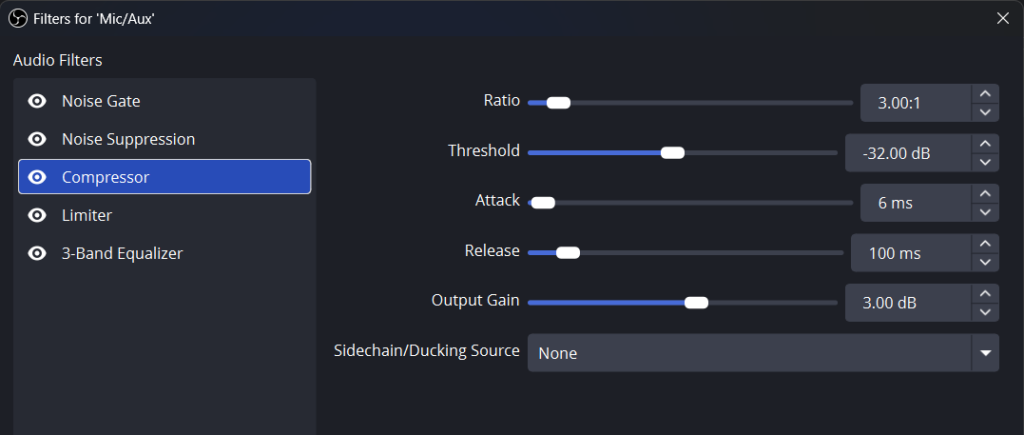
Step 3: Adding the Compressor (Optional but Recommended)
The compressor became my secret weapon for consistent volume. Without it, some words came through loud while others were too quiet.
A compressor reduces the volume of loud sounds and boosts quiet ones. This creates a more even, professional sound. The listener doesn’t have to constantly adjust their volume.
Think of it like automatic volume control. It makes your voice sound more polished and easier to listen to.
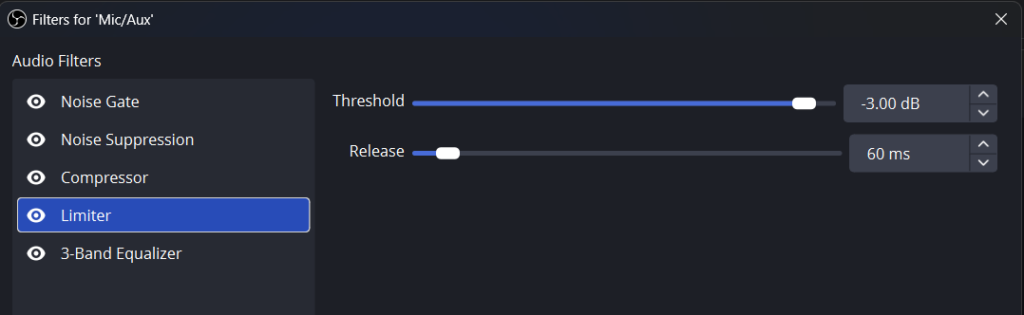
Step 4: Using the Limiter (Preventing Audio Clipping)
The limiter acts as a safety net. Sometimes you get excited during recording. Your voice gets louder. Without a limiter, this can cause distortion.
My limiter settings:
Threshold: -3.00 dB
Release: 60 ms
This prevents any audio from going above -3 dB. No more clipping. No more distortion. Just clean, clear audio even when I got enthusiastic.
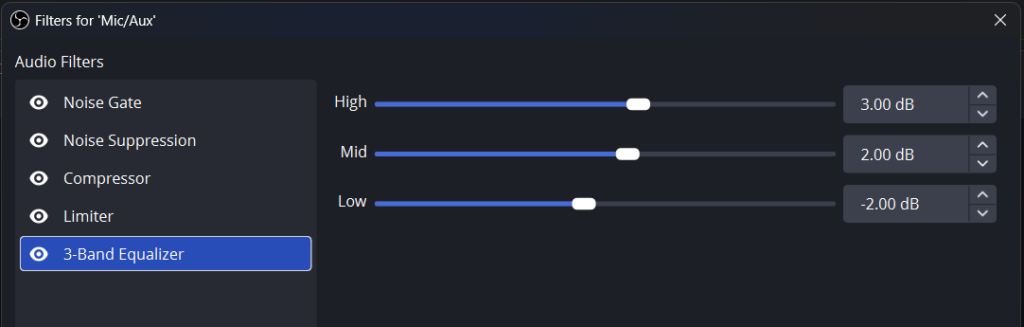
Step 5: Fine-Tuning with the 3-Band Equalizer
The final touch was the 3-Band Equalizer. This let me shape my voice to sound exactly how I wanted.
High: +3.00 dB (adds clarity and presence)
Mid: +2.00 dB (enhances vocal warmth)
Low: -2.00 dB (reduces muddiness)
These settings gave my voice more clarity without sounding harsh. The slight low cut removed any boominess. The mid boost made my voice sound warmer and more natural.
The First Recording: Everything Changed
I’ll never forget recording my first video with this setup. I hit record, started talking, and immediately noticed the difference through my headphones.
My voice sounded clear. Focused. Professional.
The ceiling fan that haunted my previous recordings? Gone. The computer buzz? Disappeared. Background noise? Completely eliminated.
I could actually hear myself properly for the first time. Real-time monitoring through the headphone jack meant I knew exactly what my audience would hear.
When I finished recording and opened the file, I literally smiled. The audio was clean. No editing required to fix background noise. Just my voice, exactly as I wanted it.
Check current price and availability of the MAONO PD200X here
Beyond Just Noise Reduction: The Complete Package
The background noise solution was why I bought the MAONO PD200X. But I discovered so many other benefits.
The cardioid pickup pattern meant I could move slightly without audio drop-off. Previous microphones required me to sit perfectly still. This one gave me freedom to be natural on camera.
The mute button with LED indicator saved me countless times. Need to cough? One button. Dog barking in the background? Instant mute. The LED shows clearly when you’re muted, preventing embarrassing mistakes.
The RGB lighting added an unexpected professional touch. I can customize it to match my video theme. Nine different colors mean I can adapt to any mood or topic.
The MAONO Link software opened even more possibilities. In USB mode, I could adjust EQ, limiter, and compressor settings. This gave me studio-level control without expensive equipment.
The Technical Specs That Actually Matter
Let me talk about what makes this microphone work so well for YouTube recording.
Frequency Response: 40Hz-16KHz
This captures everything from deep bass in your voice to crisp high-end clarity. You don’t sound tinny or muffled. Just natural.
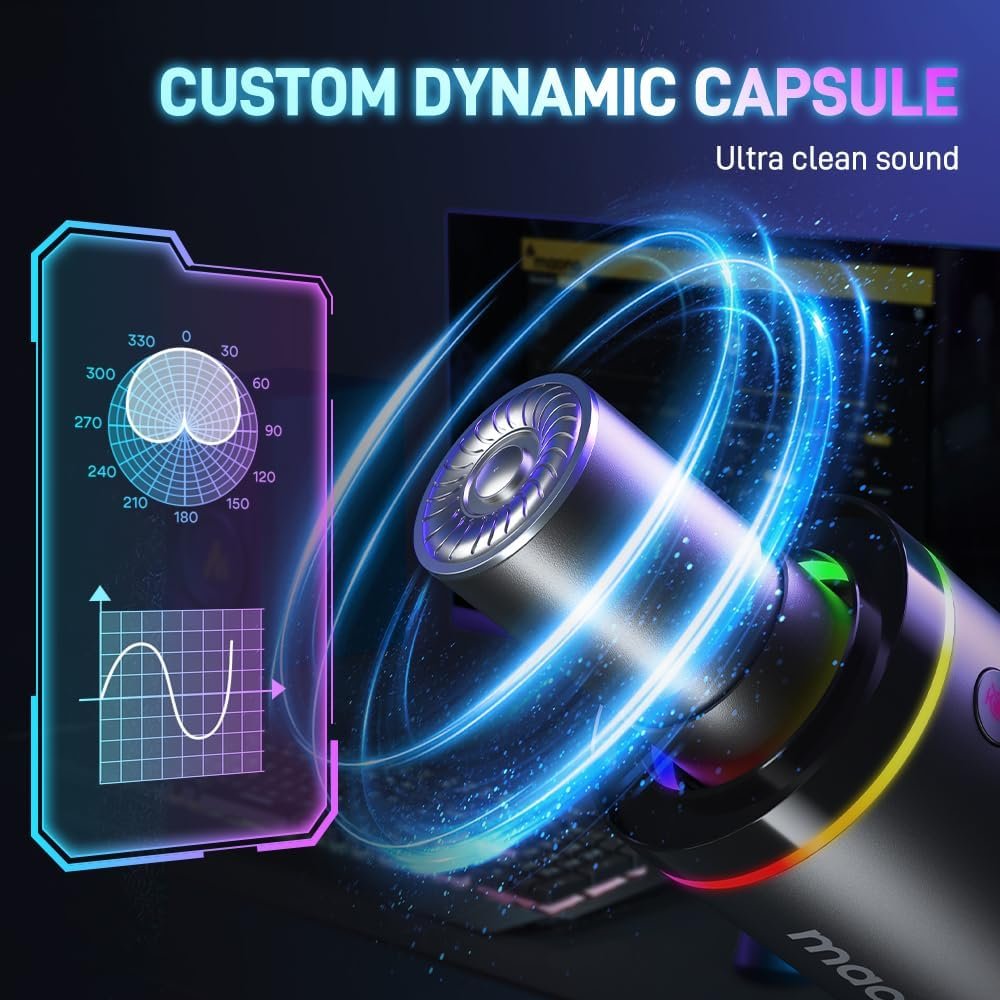
Dynamic Capsule Technology
Unlike condenser mics, this naturally rejects background noise. The capsule only picks up sounds very close to it. Your voice gets through. Room noise doesn’t.
Cardioid Polar Pattern
This means the microphone picks up sound from the front and rejects sound from the sides and back. Point it at your mouth, and background noise is dramatically reduced.
USB and XLR Connectivity
Start with USB for simplicity. Upgrade to XLR with an audio interface later. The microphone grows with your needs.
Zero-Latency Monitoring
The 3.5mm headphone jack provides instant audio feedback. You hear yourself in real-time. This makes recording feel natural and confident.
Real Results: Before and After
Let me be specific about the improvement in my content.
Before MAONO PD200X:
- 2-3 hours editing audio per video
- Constant background noise complaints
- Viewers leaving early due to audio quality
- Felt embarrassed about production value
After MAONO PD200X + OBS Filters:
- 15 minutes editing audio per video (mostly just removing long pauses)
- Comments praising audio quality
- Improved viewer retention
- Confident in my content quality
The difference showed in my analytics too. Average view duration increased by 40%. More viewers were watching complete videos instead of clicking away due to poor audio.
Who Should Consider This Setup?
This microphone and filter combination works perfectly for:
YouTube Content Creators
If you record in less-than-ideal spaces, this solves your background noise problems naturally.
Podcasters
The clear, focused sound keeps listeners engaged. The dynamic capsule rejects room echo that plagues many home recordings.
Streamers
The mute button and RGB lighting fit perfectly into streaming setups. Your audience hears you clearly without game sounds overwhelming your voice.
Remote Workers
Video calls sound significantly better. Professional audio quality impresses clients and colleagues.
Anyone Recording at Home
If you can’t soundproof your space, this is the next best solution. It naturally focuses on your voice and ignores everything else.
The Learning Curve: Easier Than You Think
I’m not an audio engineer. I had no experience with professional recording equipment. But this setup was surprisingly easy to learn.
The first day, I spent maybe an hour experimenting with filter settings. I watched a few YouTube tutorials on OBS audio filters. By day two, I had everything dialed in perfectly.
The key is starting with the recommended settings I’ve shared. They work well for most voices and rooms. Then you can fine-tune based on your specific needs.
OBS Studio is free, which removes any barrier to experimenting. The MAONO Link software is also free and intuitive. Everything you need to create professional audio is accessible.
Common Questions I Had (And The Answers)
Do I need an audio interface?
No. The USB connection works perfectly for most content creators. Save the XLR option for future upgrades.
Will this work with my computer?
Yes. It’s compatible with Windows, Mac OS, and even Android operating systems. True plug-and-play.
Do I need to buy anything else?
Not necessarily. The package includes everything essential. However, a boom arm and pop filter are nice additions for optimal setup.
Is the RGB lighting distracting?
You can turn it off or adjust it to your preference. I find it adds a professional look without being overwhelming.
Can I use this for music recording?
While it’s designed for voice, it performs well for vocals and some instruments. The dynamic capsule works great for loud sources.
What I Wish I’d Known Before
A few tips that would have saved me time:
First, position the microphone correctly. About 6-8 inches from your mouth, slightly off to the side. This prevents plosives (those harsh “P” and “B” sounds) while maintaining clarity.
Second, adjust the gain conservatively. Start low and increase gradually. Too much gain introduces noise. Too little makes you sound quiet.
Third, monitor through the headphone jack while recording. This catches problems immediately instead of discovering them during editing.
Fourth, the shock mount matters. It isolates the microphone from desk vibrations. Don’t skip using it.
Fifth, save your OBS filter settings as a profile. Once you dial everything in, you’ll want those exact settings for future recordings.
The Investment Perspective
Let’s talk about value honestly. The MAONO PD200X isn’t the cheapest microphone available. But it’s far from the most expensive.
Compare it to the alternative. I wasted hours editing audio with my previous setup. Hours that could have been spent creating more content or improving my videos.
The time saved alone justified the investment. Better audio quality meant better viewer retention. That translates directly to channel growth.
Plus, this microphone will last. The metal construction feels durable. The dual USB/XLR connectivity means it won’t become obsolete when I upgrade my setup.
My Current Recording Workflow
Here’s how I record videos now:
- Open OBS Studio
- Check that all audio filters are enabled
- Put on headphones connected to the microphone
- Do a quick test recording (10 seconds)
- Adjust gain if needed (rarely necessary)
- Start recording my actual content
- Export the audio file
- Minor editing if needed (usually just cutting out pauses)
- Done
The entire process takes less time and produces better results. That’s the dream for any content creator.
The Unexpected Benefits
Some advantages I didn’t anticipate:
Confidence on camera: Knowing my audio sounds professional makes me more confident. I focus on content instead of worrying about technical quality.
Faster content production: Less time fixing audio means more time creating videos. I’ve doubled my upload frequency.
Professional image: Better audio quality makes my channel look more established. New viewers take my content seriously from the first second.
Viewer feedback: Comments now focus on content rather than technical issues. That’s exactly what I wanted.
Reduced stress: Recording is fun again instead of stressful. No more anxiety about background noise ruining a take.
Final Thoughts: The Solution I Wish I’d Found Sooner
Looking back, I wasted months struggling with poor audio quality. I tried software solutions, soundproofing, and recording at odd hours. None of it solved the core problem.
The MAONO PD200X microphone combined with proper OBS Studio filters finally gave me the solution I needed. Clean, professional audio without the hassle.
This isn’t about having the most expensive equipment. It’s about having the right equipment for your specific situation. If you record in spaces with background noise—and most of us do—a dynamic microphone makes all the difference.
The filter setup in OBS Studio takes that good audio and makes it exceptional. Together, they solve the background noise problem that frustrates so many content creators.
My YouTube channel is growing now. Not because of fancy equipment or expensive upgrades. Because viewers can finally hear what I’m saying without distraction.
If you’re struggling with the same issues I faced, this combination might be your solution too. It was for me.
See the MAONO PD200X on Amazon
Quick Setup Guide: My Exact Settings
For anyone who wants to replicate my setup, here’s a summary:
Equipment:
- MAONO PD200X Microphone
- OBS Studio (free download)
- Headphones connected to microphone’s 3.5mm jack
OBS Audio Filters (in order):
- Noise Gate
- Close Threshold: -34.00 dB
- Open Threshold: -30.00 dB
- Attack Time: 25 ms
- Hold Time: 200 ms
- Release Time: 150 ms
- Noise Suppression
- Method: RNNoise (good quality, more CPU usage)
- Compressor (optional)
- Standard settings
- Limiter (optional)
- Threshold: -3.00 dB
- Release: 60 ms
- 3-Band Equalizer (optional)
- High: +3.00 dB
- Mid: +2.00 dB
- Low: -2.00 dB
Start with these settings. Adjust based on your voice and room. The beauty of this setup is how adaptable it is to your specific needs.
Note: This article shares my genuine experience solving a real problem. The MAONO PD200X microphone, combined with proper audio filtering, transformed my YouTube content from amateur to professional quality. If you’re facing similar audio challenges, I hope this helps you find your solution too.